


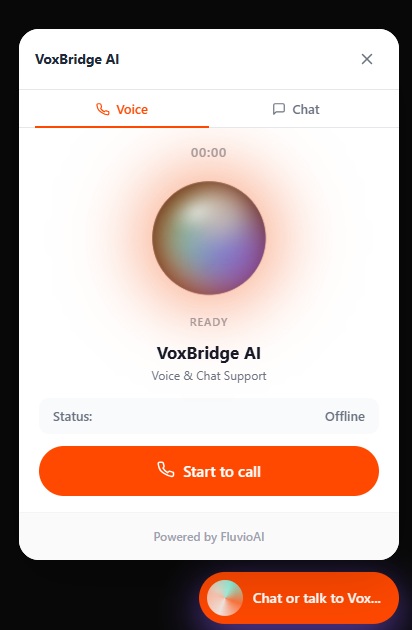
The FluvioAI website widget lets you add an AI voice and chat assistant to your website with one simple script. Once installed, visitors can click the floating button on your site to start a chat, request a call, or interact with your AI assistant depending on your selected settings.
Your agent is automatically configured for web voice calls. Please reach out to your FluvioAI tech support contact if you would like your web chat to be enabled, as this requires custom configuration on our server.
Add the script below to the footer of your website, preferably before the closing </body> tag. If you are using WordPress with Elementor, you can add it using an HTML widget on a specific page, or through your site’s footer/header code manager if you want it to appear site-wide.
For each agent, update the values such as the project ID, company name, assistant name, colors, and display text.
<script src="https://fluvioai.github.io/Fluvio-web-widget/fluvio-button-widget-v2.js"
        data-webhook="https://hook.us2.make.com/8inld3fbsnclj96ucur12awsbyjmsxb5"
        data-project-id="ABC123"
        data-mode="voice"
        data-default-mode="voice"
        data-color="#FF4800"
        data-position="bottom-right"
        data-title="AI Assistant"
        data-subtitle="Voice & Chat Support"
        data-fab-text="Talk to AI"
        data-fab-style="pill"
        data-agent-name="Alex"
        data-company-name="Acme Corp"
        data-greeting="Hi! I'm {{AI_agent}}, your AI assistant. How can I help you today?">
</script>
Parameter Values
data-webhook
Do not change this value
Required: Yes
data-project-id
Your FluvioAI Project ID. This can be found in the agent management console.
Required: Yes
Example: data-project-id=”ZWQ3ABC”
data-mode
Controls which features are available in the widget.
Options:
* dual – Shows both voice and chat
* voice – Shows voice only
* chat – Shows chat only (custom configuration needed – reach out to us)
Example: data-mode=”dual”
data-default-mode
Controls which tab opens first when the widget is opened.
Options:
voice – Opens the voice tab first
chat – Opens the chat tab first
Example:
data-default-mode=”voice”
data-color
Sets the main brand color of the widget. Use a standard hex color code.
Example: data-color=”#FF4800″
data-position
Controls where the floating widget button appears on the screen.
Common options:
* bottom-right
* bottom-left
* top-right
* top-left
Example: data-position=”bottom-right”
data-title
Sets the main title shown at the top of the widget panel.
Example: data-title=”AI Assistant”
data-subtitle
Sets the smaller subtitle shown under the main title inside the widget panel.
Example: data-subtitle=”Voice & Chat Support”
data-fab-text
Sets the text shown on the floating button before the widget is opened.
Example: data-fab-text=”Talk to AI”
data-fab-style
Controls the style of the floating button.
Options:
* pill – Wider button with text
* circle – Compact circular button
Example: data-fab-style=”pill”
data-agent-name
Sets the AI assistant’s name. This can be displayed in the widget and used in the greeting message.
Example: data-agent-name=”Alex”
data-company-name
Sets the company or client name. This can be used by the widget and backend to personalize the experience.
Example: data-company-name=”Acme Corp”
data-greeting
Sets the first message visitors see when they open the chat.
Example: data-greeting=”Hi! I’m Alex, your AI assistant. How can I help you today?”