


SSO Introduction
Single Sign-On (SSO) allows every member of your organization to access Fluvio AI using their existing corporate identity — the same credentials they use for Microsoft 365 or Google Workspace. There is no need to create or remember a separate Fluvio password.
Enabling SSO for your organization delivers the following benefits:
- Centralized access control: Add or revoke access for your entire team from your company’s identity provider — without contacting Fluvio support.
- Stronger security: SSO enforces your company’s existing MFA and security policies automatically at every login.
- Better user experience: Users click Sign in with Single Sign On and are authenticated instantly — no passwords to type or reset.
- Compliance-ready: All authentication events flow through your organization’s identity provider, making audit trails straightforward.
Note
This guide covers two identity providers: Microsoft Azure AD (Entra ID) and Google Workspace.
If your organization uses a different provider, please contact support@fluvioai.com.
Step 1: Generate Credentials from Your Identity Provider
Option A: Microsoft Azure AD (Entra ID)
Before configuring SSO in Fluvio AI, you must register Fluvio as an application inside your identity provider and collect three credential values. Follow the guide for your provider below.
✅Prerequisites
Required role: Global Administrator or Application Administrator in your Azure tenant.
Required access: Microsoft Azure Portal (portal.azure.com).
Before configuring SSO in Fluvio AI, you must register Fluvio as an application inside your identity provider and collect three credential values. Follow the guide for your provider below.
1. Log in to the Azure Portal.
Open your browser and navigate to portal.azure.com. Sign in using your organization administrator account.
2. Navigate to Microsoft Entra ID
In the top search bar, type Microsoft Entra ID and select it from the results. This opens your organization’s identity management dashboard.
3. Create a New App Registration
- App registrations — Click in the left sidebar.
- + New registration — Click the button at the top of the page.
- Fill in the registration form:
| Field | Value to Enter |
| Name | e.g., Fluvio AI |
| Supported account types | Accounts in this organizational directory only (Single tenant) |
| Redirect URI (Platform) | Web |
| Redirect URI (Value) | https://dev-yz6cvtjw4tgzedpo.us.auth0.com/login/callback |
4. Copy Your Client ID and Tenant ID
After registration, you are taken to the app’s Overview page. Locate and copy the following two values — you will need them in Step 2:
- Application (client) ID — This is your Client ID. It looks like: xxxxxxxx-xxxx-xxxx-xxxx-xxxxxxxxxxxx
- Directory (tenant) ID — This is your Tenant ID. Same format as above.
5. Generate a Client Secret
In the left sidebar, click Certificates & secrets.
- Client secrets — Click the tab.
- + New client secret — Click the button.
- Description: Enter Fluvio SSO Secret.
- Expires: Never (recommended).
- Add — Click to generate.
Copy the secret Value so we can use it later in Step 2.
Microsoft Azure — Credentials Checklist
✅ Tenant ID (from App Overview)
✅ Client ID (from App Overview)
✅ Client Secret Value (from Certificates & secrets)
Option B: Google Workspace
✅Prerequisites
Required role: Owner or Editor on a Google Cloud project, plus Google Workspace Admin access.
Required access: Google Cloud Console (console.cloud.google.com).
1. Log in to Google Cloud Console
Required role: Owner or Editor on a Google Cloud project, plus Google Workspace Admin access.
Required access: Google Cloud Console (console.cloud.google.com).
2. Select or Create a Project
At the top of the page, click the project selector dropdown. Choose an existing project or click New Project to create one named (e.g., named Fluvio AI SSO).
3. Configure the OAuth Consent Screen
Navigate to: APIs & Services → OAuth consent screen.
- User Type: Select Internal (restricts access to your organization only).
- App name: Enter Fluvio AI.
- User support email: Enter your IT team’s email address.
- Save and Continue — Click through the remaining screens without changing other settings.
4. Create OAuth Client ID Credentials
Navigate to: APIs & Services → Credentials → + Create Credentials → OAuth client ID.
- Application type: Select Web application.
- Name: e.g., Fluvio AI.
- Authorized redirect URIs: Click + Add URI and enter the following:
https://dev-yz6cvtjw4tgzedpo.us.auth0.com/login/callback - Create — Click the button.
5. Copy Your Client ID and Client Secret
A popup appears showing your credentials. Copy both values:
- Client ID — Ends with .apps.googleusercontent.com
- Client Secret — A long alphanumeric string
Google Workspace — Credentials Checklist
✅Client ID (ends with .apps.googleusercontent.com)
✅Client Secret (from Create Credentials popup)
Step 2: Configure SSO in FluvioAI
Once you have your credentials ready from Step 1, log in to Fluvio AI and enter them in the SSO Configuration panel. This activates SSO for all users in your organization.
1. Log in to Your Fluvio AI Admin Account
Navigate to your Fluvio AI dashboard and sign in using your existing admin credentials.
2. Open SSO Configuration
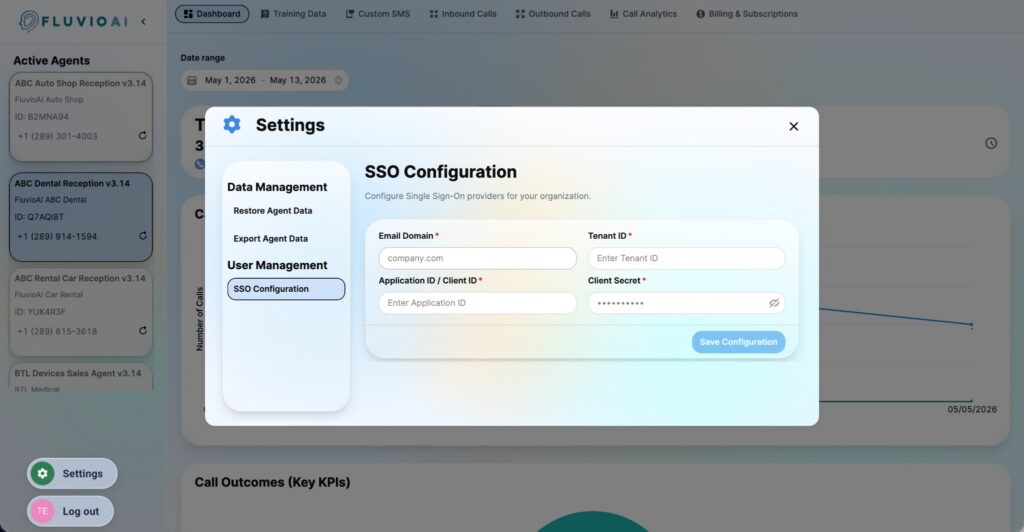
Click the Settings icon (gear icon) in the sidebar. In the left navigation, under User Management, click SSO Configuration.
3. Enter Your Domain and Credentials
Fill in the form fields using the credentials you collected in Step 1:
| Field in FluvioAI | What to Enter | Source |
| Email Domain | Your company domain (e.g., company.com) | Your organization’s email domain |
| Tenant ID | Directory (tenant) ID from Azure | Azure only — App Overview page |
| Application ID / Client ID | Application (client) ID from Azure or Google | Azure: App Overview / Google: Credentials popup |
| Client Secret | The secret Value generated in Step 1 | Azure: Certificates & secrets / Google: Credentials popup |
Note
The Tenant ID field is only required for Microsoft Azure AD.
If you are using Google Workspace, leave the Tenant ID field blank.
4. Save the Configuration
Click the Save Configuration button. Fluvio AI will validate your credentials and activate SSO for your domain.
5. Test the SSO Login
Open a new incognito / private browser window and navigate to the Fluvio AI login page:
- Sign in with Single Sign On — Click the button.
- Enter an email address with your company domain (e.g., you@company.com).
- Sign in with Single Sign On — Click the blue button.
- You should be redirected to Microsoft or Google to complete authentication.
- After authenticating, you are returned to Fluvio AI and signed in automatically.
✅ Setup Complete
SSO is now active for all users with your email domain. Any user who visits the Fluvio AI login page and clicks Sign in with Single Sign On will be authenticated through your identity provider.
Existing users who previously signed in without SSO will continue to have access to their existing data after switching to SSO login.